Installation Instructions
New installation:
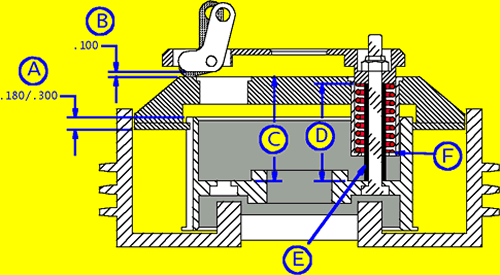
1. Install a new set of friction and steel plates, and verify that the stack height (dimension A) is between .180 and .300. This dimension will need to be consistently maintained for consistent operation of the lockup. If this dimension is greater than .300, add steel plates to get at least .300. We recommend holding this dimension around .200/.220 to start.
2. Install the pressure plate with 3 spring cups, springs, spring collars and nuts on the short studs to hold the pressure plate in place.
3. Measure dimension C through an open spring cup hole.
4. Cut 3 pieces of 3/8" x .058 stand off tubing (E) and face the ends square in a lathe. Make the length of the tubes (dimension D) .120 shorter than dimension C.
5. Install the 3 remaining springs and cups and install the lockup onto the 3 long studs, turning the nuts down 1 turn at a time to avoid cocking the lockup and bending the studs. Do not over tighten the nuts, to avoid crushing the stand off tubes into the bottom of the lockup.
6. Verify that the distance from the pressure plate to the underside of the lockup lever (dimension B) is .100. This will make the lever stand at 90° to the lockup in operation.
Adjustment and tuning:
1. To adjust the 3 springs held by the lockup, place shims in the bottom of the spring cup at (F). With no shims, the spring length is 1.250, the same as the other 3 springs when the collars are flush with the top of the pressure plate. Do not preload or shim the springs more than .250, to avoid coil bind.
2. As the clutch pack wears in operation, maintain the .100 clearance at (B) by adding steels or changing the length of the standoff tubes. We recommend keeping this between .090 and .110. As this dimension grows, the lockup effect gets more aggressive because the weights rotate in a larger circle which increases the centrifugal force, and the leverage of the levers increases as their angle increases.
3. Clean the lever pivots and lubricate with oil occasionally.
4. 4. A good staring setup for a pro stock bike is 246 lbs of spring pressure and 15 grams of weight on the levers. Long gold springs at .100 preload create 246 lbs of static pressure and 5 of the washers and one bolt and nut supplied in the weight kit weigh 15 grams. Each washer weighs 1.25 grams. If you want the clutch to slip more on the starting line, decrease the static spring pressure. If you need the clutch to lock up sooner or harder, add more lever weight. More powerful engines will need more pressure and weight. Refer to our spring pressure chart for more spring pressure information. Clutch-Pro M Software is available to make setup comparisons off the track - call for information.
5. All 3 springs do not need to be set exactly the same, but they need to be balanced to keep the pressure plate from cocking when released. Try shimming the 3 fixed springs under the lockup just enough that you can set the 3 adjustable springs approximately .100 to .150 below flush and still have your desired spring pressure. This will allow the widest range of adjustment of spring pressure for track conditions without removing the lockup and reshimming the 3 fixed springs between rounds.
6. The MTC multi-stage lockup is installed the same way as described above, except that 6 stand off tubes are used and all 6 springs must be adjusted with shims.